Research is rarely limited to a single contributor performing a single role. Behind every research output are people contributing in various ways: software development, data analyses, methodology design, and much more. Often, the same person contributes in several of these ways. Until now, Crossref metadata could only capture part of that picture, but this is changing with Schema 5.5.
Through user experience research (UXR) initiatives that take into account our diverse membership and community, we can have a continuous, deeper understanding of the role of metadata in our members’ workflows, and ensure that our work continues to meet our community’s needs. Your support is the key to this process, and will positively impact the wider community - and if you’d like to start today, you can take part in our latest initiative: help us improve our Events page by sharing your thoughts on the page’s feedback form.
Our 2026 Community Update took place on 13 May. Two calls, one for the eastern and one for the western time zone, highlighted how our global community is growing, how we’re refining the metadata that supports trust in the scholarly record, and connecting records more effectively through our latest tools.
Funding is one of the key enablers of the research lifecycle, but has been one of the hardest parts of the scholarly record to identify, describe and connect. This is slowly changing as we have recently reached a very exciting milestone for Crossref’s Grant Linking System (GLS). What makes it remarkable is not only the numbers reached, but where the data comes from. Research funders, who joined Crossref as members, have actively contributed more than 200,000 grants to the Research Nexus (Figure 1).
Implementing Crossmark includes several stages, some of which require technical knowledge to modify websites or PDFs.
Full implementation means that you’ll need to include Crossmark-specific metadata when registering content and add the Crossmark button to your website and PDFs. If you are not able to finish the process, that’s ok, make a start and continue when you have the expertise to do so.
Step one: Designate an update policy page and assign it a DOI
You will need to explain to your readers how your content is updated after publication and indicate when this has happened. The first step is to have a single page on your website explaining these processes. This page should be registered and have a DOI to enable persistent linking. It must include your policies on corrections, retractions, withdrawals and other updates. It can include links to other relevant policies such as author submission guidelines and peer review guidelines, and may contain definitions and explanations of additional custom metadata fields you have used. You may already have a suitable page on your website, but don’t forget to assign it a DOI and register the metadata with us.
Step two: Add the policy page DOI to all of your content
It’s important to apply Crossmark to all of your current content, not just content that has updates. When an item is published, you don’t know if it will be updated in the future. Therefore, a researcher may download a PDF article today without a Crossmark button, and if the article is subsequently updated they have no way of knowing if their locally-saved version is still current. If you’re using the Crossmark service, we expect you to display the Crossmark button on all your content, whether it has an update or not.
At a minimum, you will need to include the update policy page in each metadata record that you register. Here’s how to do that via several registration methods:
XML deposit
If you register content with us in XML format using either the admin tool or HTTPS POST, you can include Crossmark metadata in your initial deposit. You can also add Crossmark metadata to existing DOIs using a resource-only-XML deposit.
We provide sample a sample XML file with the fields you need to include.
Using the new Metadata Manager
Metadata Manager allows you to include the DOI of your Crossmark update policy in the metadata of journal articles. You can also register DOI records for post-publication updates in Metadata Manager (see step three).
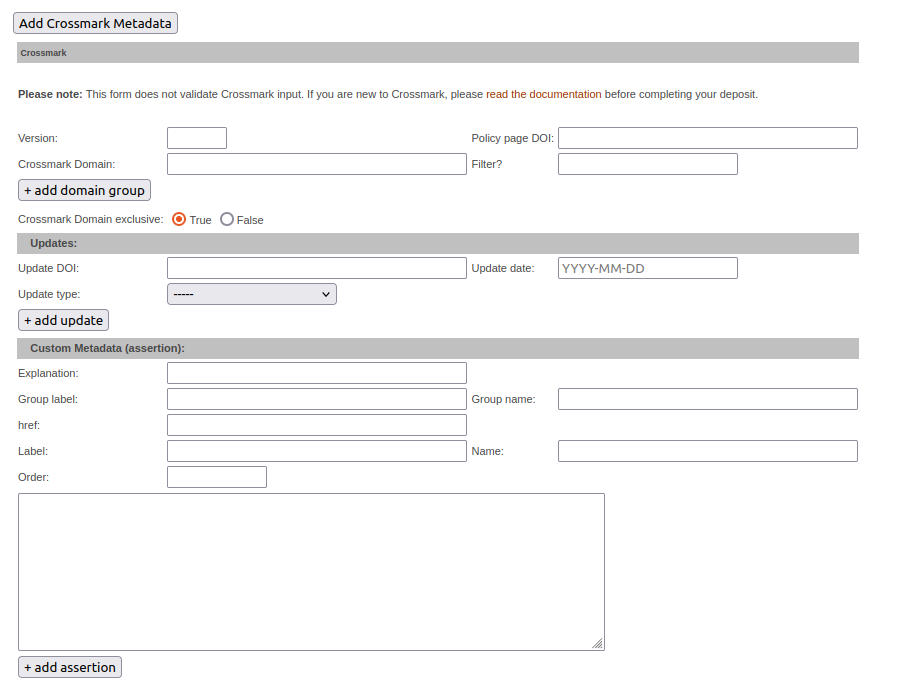
Using the web deposit form
Using the web deposit form you can register Crossmark metadata for journal articles.
Fill in the ‘Policy page DOI’ field (and other fields if they are relevant). Note that Crossmark metadata for types other than journal articles (such as books or preprints) is not supported by the web deposit form.
Step three: Add metadata that reflects any updates to specific items
If a registered item is updated, you need to register a different DOI record for the update. This is only necessary for editorially significant changes—those that are likely to affect the interpretation or crediting of the work, and where a separate update notice is usually published. Minor changes can be made directly to the content without notifying Crossref, including cases such as minor spelling corrections or formatting changes that don’t affect the metadata.
There are 12 defined types of update accepted in our schema:
addendum
clarification
correction
corrigendum
erratum
expression_of_concern
new_edition
new_version
partial_retraction
removal
retraction
withdrawal
If an update does not fall into one of these categories, it should instead be placed in the more information section of the pop-up box in the web deposit form by being deposited as an assertion.
When deposited content corrects or updates earlier content, the DOI(s) of the corrected content must be supplied in the Crossmark metadata. See the Crossref unixref documentation section on updates for examples of how this is recorded in the Crossmark metadata. You can also use the Metadata Manager helper tool to register a DOI record for an update by choosing “New record” and then “Post-publication update”.
When a correction is made in situ (that is, it replaces the earlier version completely), then the DOI of the corrected content will be the same as the DOI for the original Crossref deposit. In situ updates are not considered best practice as they obscure the scholarly record.
Step four: Apply the Crossmark button to your HTML pages
There are two options for applying Crossmark to your website.
Add the Crossmark logo with a link.
Install a JavaScript widget that creates a Crossmark popup.
These are explained in the following sections.
Add a logo with a link
This is the simplest way to implement Crossmark on websites. Simply add a version of the Crossmark logo to the landing page for each of your registered items (usually the page where the abstract is shown) and link the logo to the Crossmark page of the relevant DOI.
There are several variations of the Crossmark logo, for example you can use:
domain tells the Crossmark system what kind of static content the link is coming from, and will change for different static formats (such as html, pdf, epub)
date_stamp tells the Crossmark system the date on which a last Major Version of the PDF was generated. In most cases, this will be the date the article was published. However, when a member makes significant corrections to a PDF in-situ (no notice issued, and no new version of the work with a new DOI) then the date_stamp should reflect when the PDF was regenerated with the corrections. The system will then use the date_stamp in order to tell whether the reader needs to be alerted to updates or not. The date_stamp argument should be recorded in the form YYYY-MM-DD (learn more about ISO 8601).
The final result will look like this:
Clicking the logo will open a new tab or window displaying the Crossmark information.
A Crossmark popup
A different solution that is more technical to implement enables a popup containing Crossmark information. It has the advantage that readers do not leave your website when clicking the button.
We supply a templated HTML/JavaScript code widget which will embed the Crossmark button and functionality into your web pages. The latest version of the widget (v2.0) is below. Ensure you are using the latest version and that it points to our production server. Do not alter the script or host the button locally.
Select one of the variations of the Crossmark button available. You can change the Crossmark button that is used simply by changing the src attribute of the img element to point to one of the following, for example:
Alternatively, check the source on this page to see the correct link for each style of button.
The button can be resized according to your design needs by changing the image width in the image tag but do follow the Crossmark button guidelines.
The Crossmark popup needs to have a DOI to reference in order to pull in the relevant information. This needs to be embedded in the head of the HTML metadata for all content to which Crossmark buttons are being applied as follows:
For additional transparency and to enable easier machine-reading of Crossmark metadata, you can modify the metadata of your PDFs. This is best done during production before the final PDF has been created and any security has been added to the document.
A minimal XMP file for the above PDF would look like this:
It may appear redundant to apply Crossmark elements both in their own Crossmark namespace as well in the pdfx namespace, but the latter is necessary to ensure the Crossmark elements appear in the PDF dictionary, a specific requirement for some search engines. Any metadata found in the pdfx namespace will be copied over to the document info dictionary. Simply make sure that Crossmark metadata is in the pdfx namespace in the XMP provided to the tool.
Further options: adding more information to the Crossmark button
The Crossmark box has a section for you to show any additional non-bibliographic information about the content. You decide what to include here, and you are not required to add anything. In this section, Crossmark participants often include publication history dates, details of the peer review process used, and links to supporting information.
If you are already registering this additional metadata at the time you implement Crossmark, there is nothing more you need to do. If you start to register these metadata elements after you have set up Crossmark, they will automatically be put into the Crossmark box.
Please note that @order is an optional attribute. If @order is absent, it will return results in the order in which you list them in your deposit, but this is not guaranteed. If you want to be sure of the order, then you can use @order. Learn more about the Crossmark deposit elements (including what is optional) in the schema.
Page maintainer: Isaac Farley Last updated: 2025-December-10